Using Elasticsearch on Amazon EC2
Elasticsearch is a distributed search server offering powerful search functionality over schema-free documents in (near) real time. All of this functionality is exposed via a RESTful JSON API. It's built on top of Apache Lucene and like all great projects it's open source.
Update: I've updated this post to be compatible with recent versions of Elasticsearch.
I need to index about 80 million documents, and be able to easily perform complex queries over the dataset. Results need to be returned quickly, and it also needs to be able to withstand considerable load.
Due to its distributed nature, Elasticsearch is ideal for this task, and EC2 provides a convenient platform to scale as required. In this first post I'm going to cover my experiences setting up an Elasticsearch cluster on EC2, and demonstrate how simple it is to get started.
I'd reccomend downloading a copy locally first and familiarising yourself with the basics, but if you want to jump straight in, be my guest.
I'll assume you already have an Amazon AWS account, and can navigate yourself around the AWS console. If not - get started over at aws.amazon.com.
Fire up an instance of with your favourite AMI. I chose a m1.large running the latest Ubuntu, but whatever works for you.
Start by downloading a copy of the latest version - at the time of writing it's 0.20.21.4.2
wget https://download.elasticsearch.org/elasticsearch/elasticsearch/elasticsearch-1.4.2.zipNext: unzip it.
sudo unzip elasticsearch-1.4.2 -d /usr/local/elasticsearch
rm elasticsearch-1.4.2.zip
Install the cloud AWS plugin so you can take advantage of features like automatic node discovery.
cd /usr/local/elasticsearch/elasticsearch-1.4.2/
./bin/plugin install elasticsearch/elasticsearch-cloud-aws/2.4.1
Now that the AWS plugin is installed, configure it by adding your Amazon credentials to the elasticsearch configuration file - config/elasticsearch.yml. Elasticsearch accepts configuration files in YAML or JSON. Internally, settings are collapsed into 'namespaced' strings, so it's merely matter of preference what format you use.
A super-simple YAML configuration is:
cloud:
    aws:
        access_key: <YOUR AWS KEY>
        secret_key: <YOUR AWS SECRET>
discovery:
    type: ec2
or as JSON:
{
    "cloud" : {
        "aws" : {
            "access_key" : "<YOUR AWS KEY>",
            "secret_key" : "<YOUR AWS SECRET>",
        }
    },
    "discovery" : {
        "type" : "ec2"
    }
}
Make sure that your AWS user has these permissions assigned, so that elasticsearch can perform the necersary actions to automatically discover new nodes: ec2:DescribeAvailabilityZones, ec2:DescribeInstances, ec2:DescribeRegions, ec2:DescribeSecurityGroups, ec2:DescribeTags.
You're now just about ready to start elasticsearch, but first I recommend that you name your cluster by adding the cluster.name setting to your configuration. If you don't then the default value of 'elasticsearch' will be used. This is undesirable as any other elasticsearch process started on your network using default settings will also discover and join the cluster. Whilst this is probably harmless for the moment, in a production environment this would be a real bitch as it would cause unwanted rebalancing of shards and replicas. Add a cluster name and start Elasticsearch by running:
./bin/elasticsearchHint: I was caught out by this: If your instance is running outside of the us-east availabilty zone, then you will also have to define the AZ using the cloud.aws.region setting. As I host in Europe I used: eu-west–1
Whilst initializing, Elasticsearch will use your AWS credentials to attempt to find an existing cluster to join. Obviously, as this is your first node, an existing cluster won't be found so instead a new cluster is started, electing this node as the master.
Your node is now running and is accessible (when using default configuration) on port 9200
curl -XGET http://localhost:9200

{
  "status" : 200,
  "name" : "Thor",
  "cluster_name" : "Asgard",
  "version" : {
    "number" : "1.4.2",
    "build_hash" : "927caff6f05403e936c20bf4529f144f0c89fd8c",
    "build_timestamp" : "2014-12-16T14:11:12Z",
    "build_snapshot" : false,
    "lucene_version" : "4.10.2"
  },
  "tagline" : "You Know, for Search"
}
As we didn't configure the node.name in our settings, a name has been randomly selected from a list of Marvel characters. I got lucky and now have a node called Thor.
Now that you're up and running, index some data. Elasticsearch has a RESTful HTTP API, so simply send a PUT request to send some data into Elasticsearch. Pass your document as JSON, For example:
curl -XPUT http://localhost:9200/company/uk/1 -d '{
    "name" : "Duedil Ltd",
    "description" : "Innovative startup opening up company information in the UK and Ireland, for free.",
    "url" : "http:\/\/www.duedil.com",
    "tags" : ["passion capital", "business information"]
}'
curl -XPUT http://localhost:9200/company/uk/2 -d '{
    "name" : "GoSquared",
    "description" : "Real-time analytics for your website. GoSquared helps you understand and improve your online presence.",
    "url" : "http:\/\/www.gosquared.com",
    "tags" : ["analytics", "passion capital"]
}'
curl -XPUT http://localhost:9200/company/uk/3 -d '{
    "name" : "Flattr",
    "description" : "Flattr was founded to help people share money, not just content.",
    "url" : "http:\/\/www.flattr.com",
    "tags" : ["micro payments", "passion capital"]
}'
...
At this point I'd like to introduce you to BigDesk. It's a neat little GUI written in javascript for monitoring elasticsearch clusters, you can run it from the web (assuming you have the relevant ports open) or install it as a plugin (just like the AWS cloud plugin you just added).
Connect to your node using BigDesk, and click the 'cluster' tab.
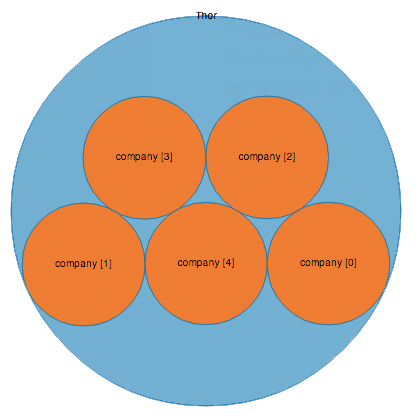
This shows your node, and the data it contains. By default, your index is split into 5 shards, represented here by orange circles. Your cluster state will currently be yellow as only the primary shards have been allocated, and the replicas have not. I'll explain what that means in a minute.
Update: What does Elasticsearch Yellow status mean? I've written a follow-up post explaining elasticsearch 'yellow' cluster status.
This is going well, but nobody's gonna be impressed if you brag about a cluster containing a single node - so before anyone finds out - fire up another instance from the AWS console and follow the same steps as before. When you start elasticsearch on this new instance your existing cluster will be detected and your node will join.
Internally, the EC2 discovery module uses the default Zen discovery module, by first polling the AWS API to return a list of IPs to ping. If you have a lot of other active nodes running (but not running elasticsearch) then the discovery phase can timeout before your cluster has been discovered. If this is a problem for you, you can instruct elasticsearch to filter your instances by Security Groups or Tags. Use the discovery.ec2.groups and/or the discovery.ec2.tag.* settings as required.
Tab back to BigDesk. If everything has gone to plan you will now see your second node listed in the diagram. I called mine Loki, because he's Thors brother, and I'm very easily amused.
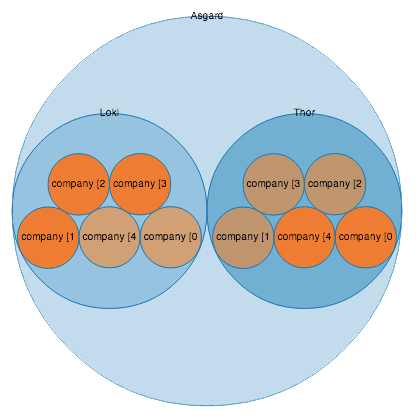
Now that another node has joined the cluster, they can distribute the shards amoungst themselves. Each shard is now also replicated and placed on another node, meaning if ever a node fails all data is still available elsewhere in the cluster. Neat. Once the replicas have been allocated your cluster health will be update to green.
So that's it for the moment - you already have a multi-node search cluster running in the cloud. Have a play around with adding more nodes, and observe in BigDesk what happens when a node leaves/joins the cluster. It's impressive to see how well elasticsearch handles reballencing without you having to worry about a thing.
We'll start putting this cluster to good use in the next post where I will be discussing bulk indexing with Elasticsearch. Follow me on twitter or stalk me in any other way to be alerted when this happens.